Camera events
Events introduction
The major feature of Camlytics Single that makes it stand out from the crowd of Video Surveillance systems is an ability to analyze video in real time, to generate different kinds of events and to store them in a database, providing a flexible API for the events for developers.
Analytics is able to detect objects in the scene, identify, classify and track them. With zones/lines you can collect all kinds of information from your camera - count people, detect crowds, classify pedestrians and vehicles, detect abandoned or stolen objects, etc.
Calibration
In order to track objects properly (for any purposes - counting, heatmaps, motion), its essential that analytics is calibrated first.
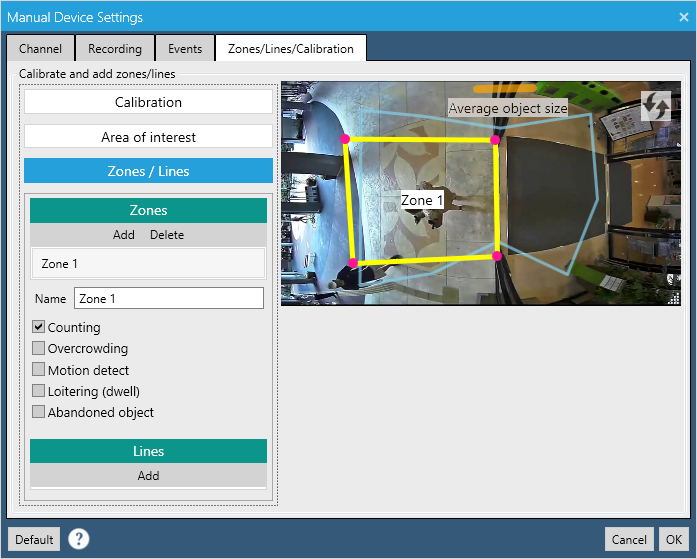
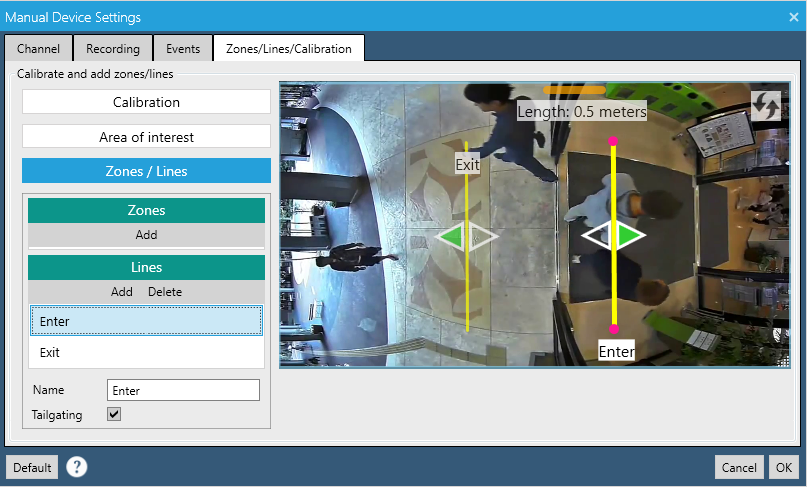
Enter calibration settings by clicking on "Camera events" in channel menu or icon and choosing "Zones/Lines/Calibration" tab.
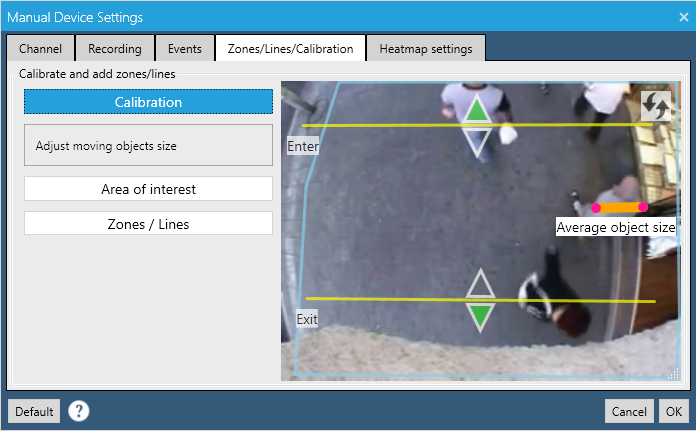
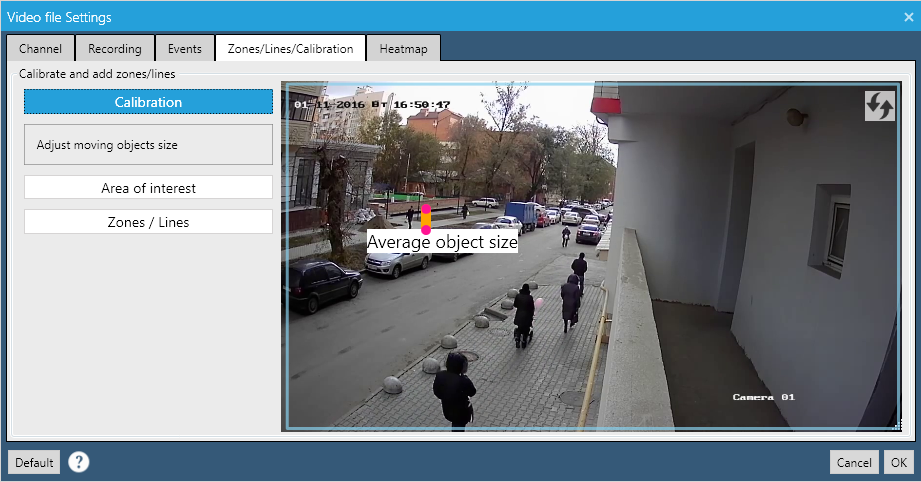
The calibration section will be chosen by default. It is a very important setting because video analytics accuracy depends on it. Here you will notice the ruler on the video snapshot which has to be adjusted to a real object on the scene. Choose the average object that you want to track and adjust the ruler to its dimensions.
See the best possible calibration for particular people counting camera - the ruler is adjusted to a real person (image above).
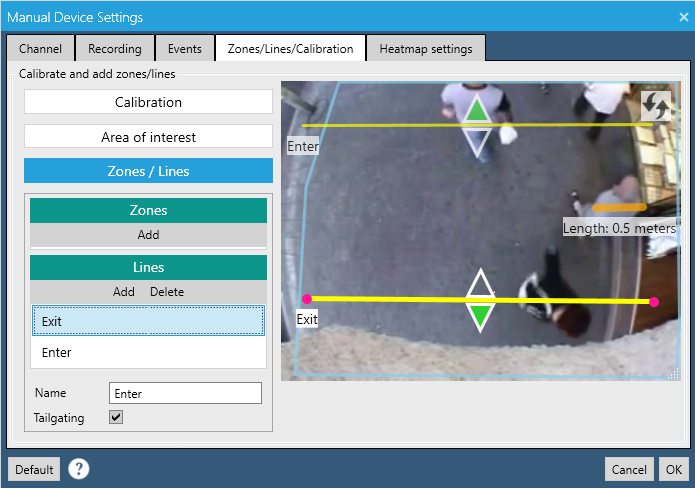
In case of strongly varying object sizes on the scene, try to choose the smaller object (image below).
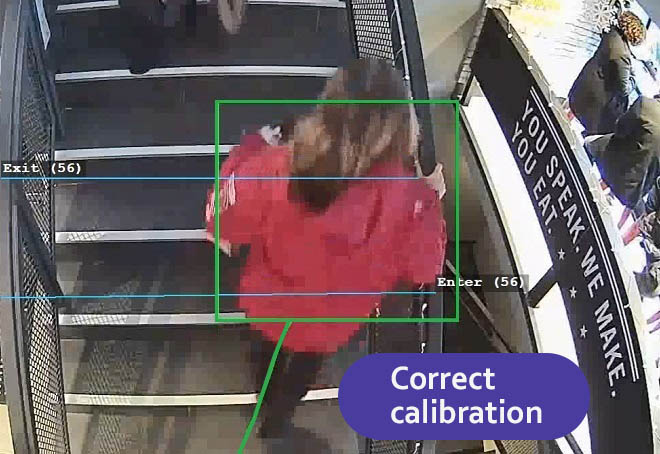
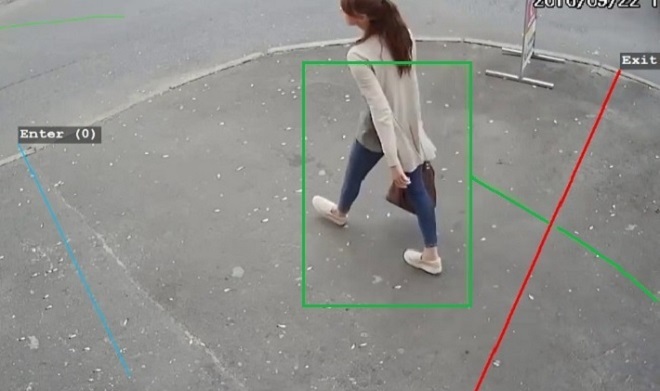
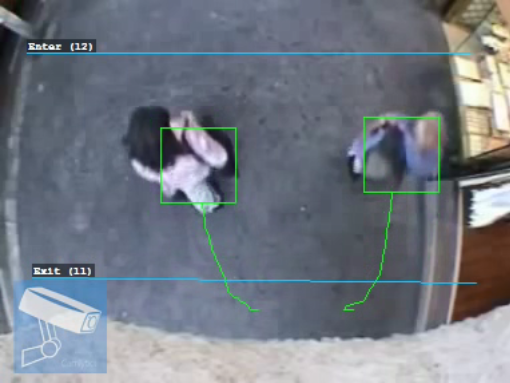
After proper calibration all tracked green frames should be approximately of the size of the moving objects, see example of proper calibration below (for Overhead camera profile only).
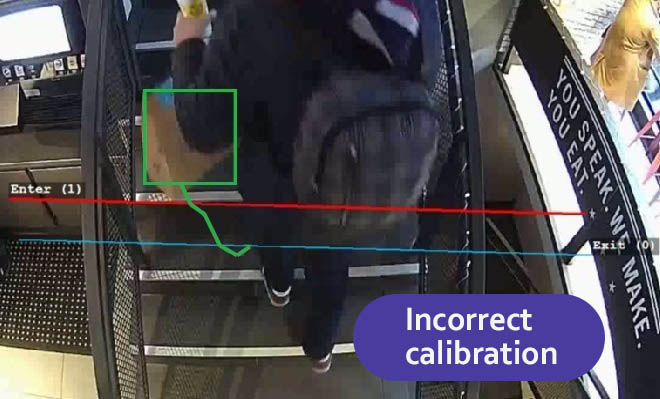
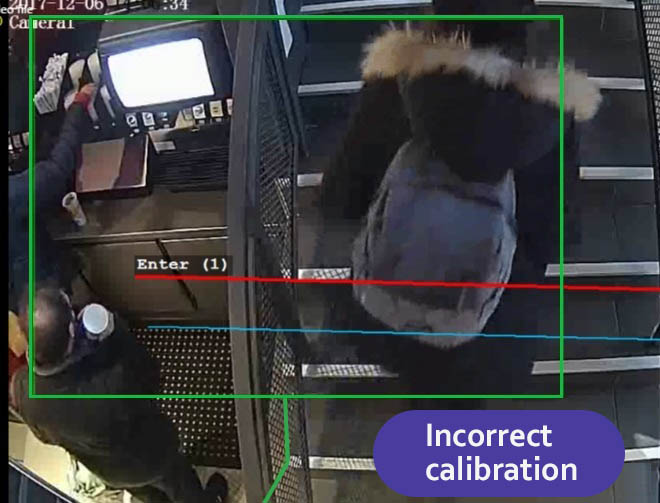
If the ruler was set too big or too small, tracking results will be poor and analytics will be unstable (see examples below, for Overhead camera profile only).
For Tilted camera profile it's also important to set marker correctly as it will affect minimum and maximum object sizes, see the correct detection example below.
After proper video calibration you can proceed to the Area of interest settings.
Area of interest
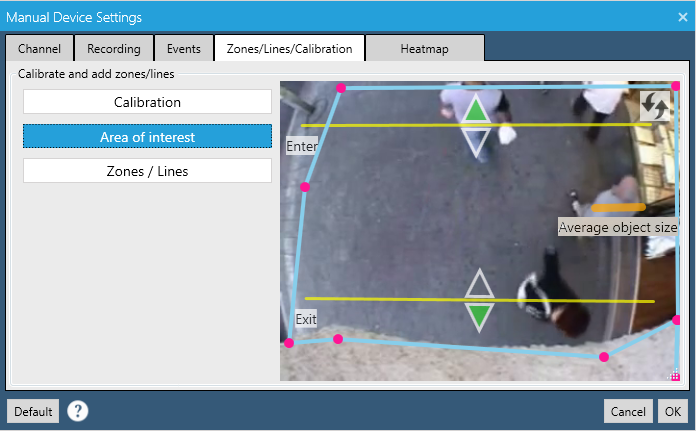
Area of interest is responsible for setting region in which video analytics will work and objects will be detected, by default it is set to the entire camera view.
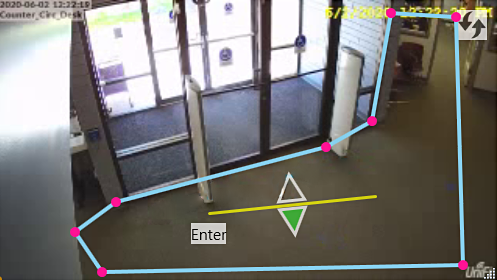
This is very useful for separating non-relevant or noisy areas on the scene, for example, driveway from the sidewalk (first image) or moving door in the hall (second image).
You can add or delete extra nodes from the area by double-clicking it.
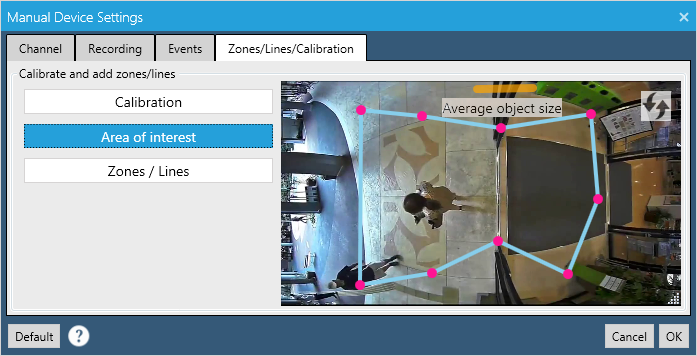
Example below shows how the moving doors are excluded from the detection. Without this exclusion the whole line counting would be impossible.
Zones & lines
Zones and lines allow you to set areas where different camera events will be generated. For example, you can add zone where you want signalize all of all entered objects, line where you want to count people, etc.
One or multiple scenarios can be applied to a zone, here we will look at each of them in detail.
Counting
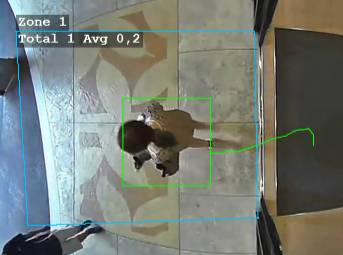
This scenario will count the total amount of objects currently belonging to the zone. It also shows recent average amount of objects that where inside. See the example below - as it looks like in the monitor mode.
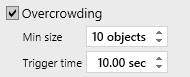
Crowding
This scenario will count objects currently belonging to the zone and signalize if the defined minimal amount of objects is present for more than trigger time.
Motion detection
This scenario will watch current zone for present of any motion - objects detected inside, lighting changed, etc.
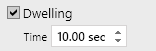
Dwelling
This scenario will detect any object that has been inside zone for at least defined time and shifted for at least defined radius.
Abandoned item
This scenario will detect any object that has been left on the scene and has been there for at least 3-4 minutes (with default analytics profile). The scenario is also able to detect removed objects, that previously had been on the scene for long time.
Lines
Lines allow object counting in all possible directions as well as notify of lines crossing. You can use as many tripwire lines as you want.
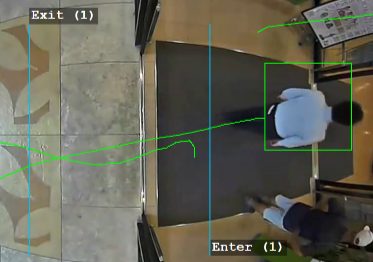
Add lines by clicking Add button and configure its direction and disposition on the frame. You can turn line crossing directions on and off by clicking corresponding arrows. A green arrow means active direction and empty arrow inactive direction. You can also change line name, that will appear in reports and statistics.
You can see the configured lines and its counters in the example below - just how it will look like in the monitor mode.
If you check the Tailgating mark you will enable the Tailgating event for that line. Tailgating event is fired when two objects cross the same line with small delay (up to 1 sec). Useful for access security monitoring, especially when you want to track office entrance gate tailgating. Efficient with overhead camera and people counting. Read more on tailgating in our use cases.
Events
Camlytics Single presents the powerful mechanism of events that are generated during video analytics process. All events belong to two main categories - those that are generated by lines/zones (for example, event "Zone join" generated by zone "Zone 1" or event "Enter" generated by "Line 1"), and events generated by video scene ("Object appear", "Object disappear", "Camera obstructed").
Every single event is generated by unique object that has the id and classification details - it can either be classified as a Human, Vehicle or Unknown. This feature will greatly help in separating unwanted objects from being counted by a line or zone (if you only want to count pedestrians, for example). On the image below you can see the list of recent events on a typical Camlytics Single setup.

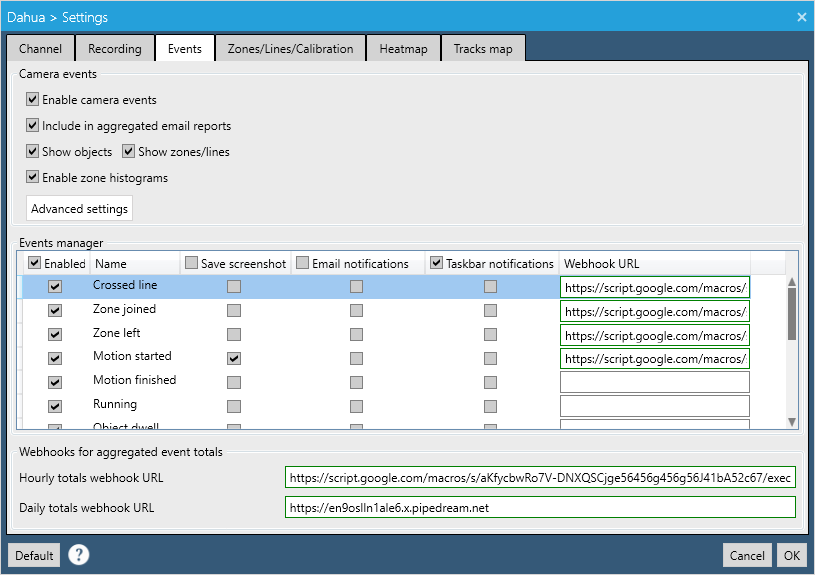
Below is description of events settings for each video channel.
Enable camera events - completely enables/disables camera events generation, increases performance significantly when disabled. Should be disabled when Camlytics Single is used for camera recording or viewing only.
Include in aggregated email reports - include channel in daily reports by all channel events, keep in mind that this should also be enabled in Global settings. More in Daily reports section.
Show objects - allows to turn off object annotation on video (green rectangles with trajectory).
Show zones/lines - allows to turn off zones/lines annotation on video.
Every single event can be configured separately.
Enable prevents Camlytics Single from generating certain unwanted or excessive events.
Save screenshots allows saving screenshots to disk for checked event.
Send email notifications enables email notifications when checked event happens (email settings can be configured from the main settings). All emails will contain event snapshot if according option is enabled.
Taskbar notifications enables popup notifications of checked events in the taskbar.
Webhook URL is the web address to make a POST request to in case of specific event. The request is made immediately and the request body contains such parameters as: channel_id, channel_name, event_name, etc. This feature is very useful when you want to trigger some custom actions but you don't want to connect to Camlytics Single API. For example, you can hook action to a IoT device that is connected via IFTTT website (ex. turn on yard lights when somebody crosses line with inbound direction). Or you want to store your events data from multiple locations in the cloud via Google Sheets - see implementation here.
Below is detailed description of each event.
| Name | Source | Description | Has object Id | Pedestrian/Vehicle classified |
|---|---|---|---|---|
| Line crossed | Line | Fired when line is crossed by object of any kind. | Yes | Yes |
| Tailgating | Line | Fired when two objects cross the same line with small delay (up to 1 sec). Useful for access security monitoring. Efficient with overhead camera & people counting. Read more in our use cases. | Yes | Yes |
| Zone joined | Zone | Fired when object has joined the zone. | Yes | Yes |
| Zone left | Zone | Fired when object has left the zone. | Yes | Yes |
| Motion started | Zone | Indicates of motion start in the zone. Triggered by object entering the zone. | Yes | Yes |
| Motion finished | Zone | Indicates of the end of motion in the zone. | No | No |
| Object dwell | Zone | Fired when object that has been in the zone for long enough time and has moved to enough distance. | Yes | Yes |
| Crowd appear | Zone | Fired when many enough objects have been in the zone for long enough time. | No | No |
| Crowd disappear | Zone | Fired when Crowd appear condition is not met anymore. | No | No |
| Abandoned item | Zone | Fired when static object has been in the zone for long time. | No | No |
| Object appear | Video scene | Fired when any object is created. | Yes | Yes |
| Object disappear | Video scene | Fired when any object is deleted. | Yes | Yes |
| Camera obstructed | Video scene | Indicates that the camera has been obstructed partly or completely by light, huge object, etc. or the camera has been shifted. Analogous to the "Sabotage" event. | No | No |
| Camera disconnected | Video scene | Fired when there are no frames from camera for long time. | No | No |
Below you can see list of fields that each video analytics event contains:
event_idtype- (Line crossed, etc.)time- local timetimestamp- time since the beginning of the video playback (in seconds)channel_idchannel_nameobject_id- id of the object that initiated the eventorigin- (Unknown, Pedestrian, Vehicle)source_id- line or zone id the event is associated withsource_name- line or zone name the event is associated withsnapshot_path- path to the event snapshot file, if anyrecording_path- path to the event video recording path, if anyvideo_file_name- name of the video file in case of Video File or Video Folder channel typevideo_file_time- time of the event relative to the beginning of video file in case of Video File or Video Folder channel type
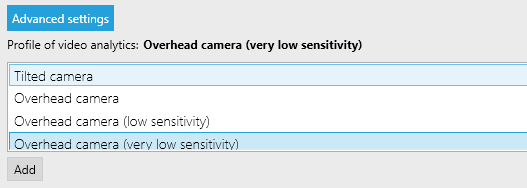
Profiles
Advanced settings allow you to configure analytics profile (or detection profile).
Profiles
allow you to tune very specific settings of video analytics, such as motion detector sensitivity, etc. which will suit the current camera scene.
There are multiple sets profiles by default: for overhead (which are best with ceiling mounted cameras) and for tilted cameras.
Use low or very low sensitivity profiles if you have a lot of obstructions in your scene (like shadows or tree branches).
Use high sensitivity profiles if objects are skipped and not detected.
Use queue counting profile if you want to track people in line from overhead camera.
It's recommended to use the Overhead profiles together with overhead camera - this will improve the counting accuracy (in case you use Camlytics Single for counting).
If you have a premium license you can inquire for the customized profile tuned specifically for your scene. Profiles are distributed as files with *.preset extension. Extended set of profiles is available for premium users.
Export
Camera events are especially useful when you can export them. In order to do that you can either request the .csv spreadsheet in statistics manager or, if you want it in real time, make use of our API.
Daily reports
If you wish to receive by email the aggregated data on each event type and on each event source ("Line 1" was crossed 1982 times, "Line 2" was crossed 983 times, etc.) with a breakdown by hours, you can opt into daily reports. In order to start receiving those, you need to enable Aggregated reports in the channel Events settings and configure the Emails and Reports sections in Global settings. In addition to that you will receive the Zone histograms report if you have any zones configured.