Vehicle speed detection solution
Camlytics software processes video streams from the range of video sources - IP cameras, webcams, video files, etc. During video processing, metadata events are generated, such as
Line crossed, Zone join, Zone left and others.
Such a powerful events triggers, as Lines and
Zones allow a lot of custom data manipulations.
Every single analytical event that comes from any
video source - IP camera, webcam, NVR, video file or video folder, has a lot of properties - source ID, timestamp, video
file time, object ID, origin, channel ID, type and others. This data can be used to find links
between different scene events. For instance, you can detect speed based on two lines in your scene.
Note: Camlytics version
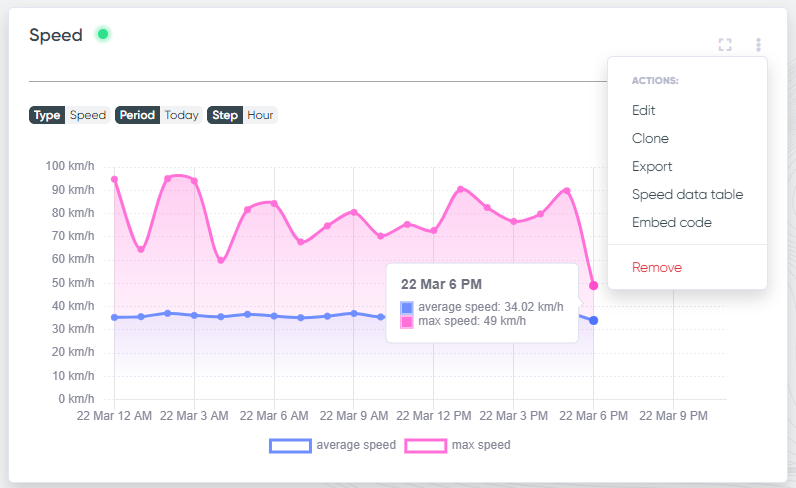
This tutorial covers the configuration of the speed detection for older, Camlytics Single software. Newer Service solution also has the same feature with a significant advantage - the speed data is collected automatically, allowing building real-time charts with multiple time periods speed comparison, average vs max speed comparison, as well as filtering detection results in a speed data table.

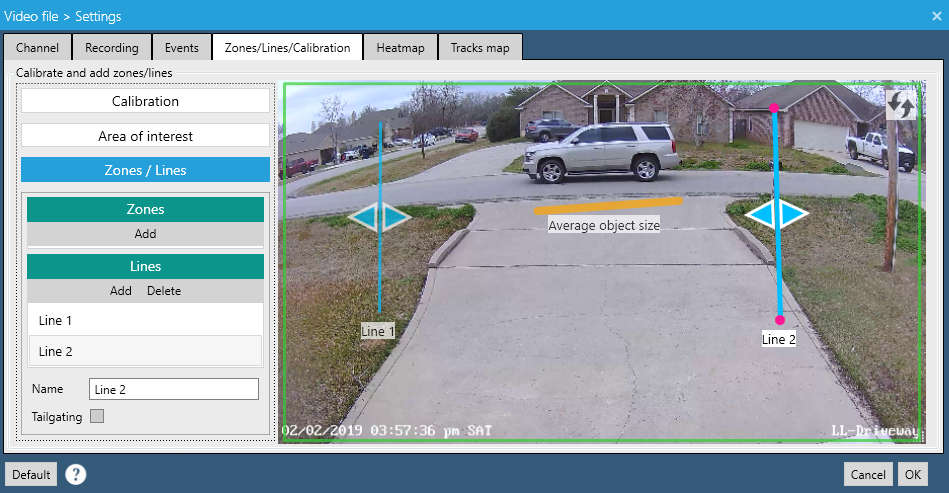
Step 1: Add 2 lines
Add any video source where you want to detect speed. Make sure you calibrate it properly so that all moving objects are detected correctly and in time. Place two lines one after another so that they cover the full vehicle travel distance. The greater the distance the better. Make sure that moving vehicles are always detected and both lines generate events for each vehicle.

See how it looks in action, you'll be able to detect the speed for two vehicles in the following video:
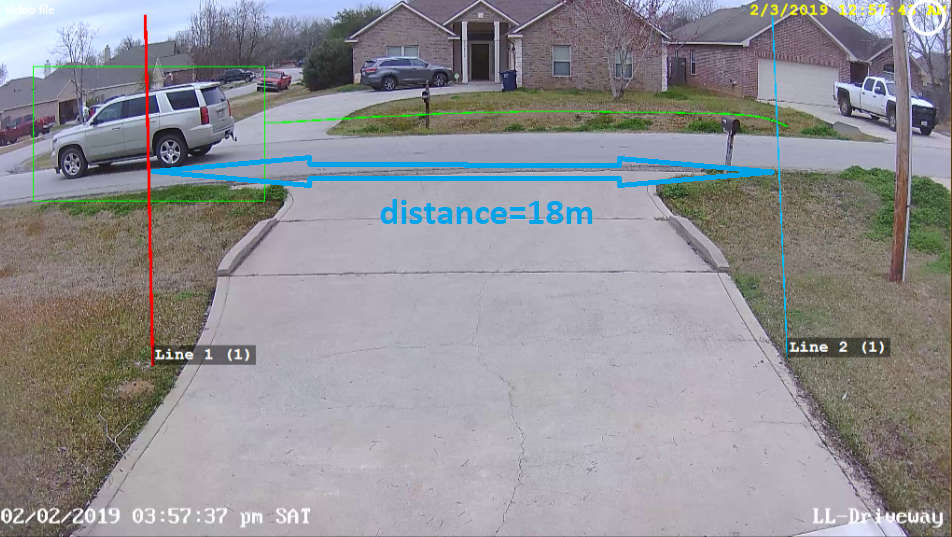
Step 2: Measure distance between the lines
Measure the real distance between those lines. The greater the distance the more precise the speed calculation will be. The distance is 18 meters in our case.
Important! Tripweres must be calibrated in the same direction (all directions, or both right, or both left) in order to register correct speed events.

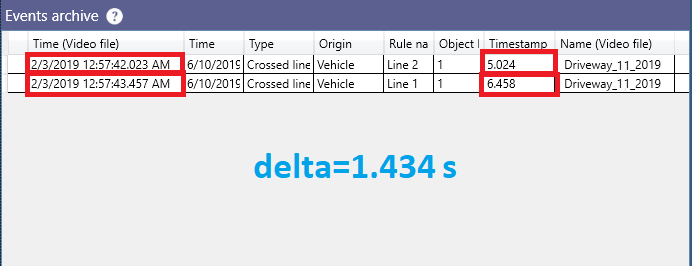
Step 3: Calculate speed
As vehicles travel through two lines, every vehicle will have the same object ID for both events generated by those lines. That is how they can be matched. In our example there are two events with object ID = 1 and the timestamps are 5.024s and 6.458s. The timestamp delta = 6.458 - 5.024 = 1.434s. Knowing the delta and the distance between lines we can calculate the speed = distance / timestamp delta = 18 / 1.434 ~ 12.55 m/s = 45.18 km/h

Therefore, the vehicle traveled with the speed of approximately 45 km/h. The whole speed detection process can be automated by
collecting all Line crossed events, exporting them
into .csv file and then using our calculator below. Make sure that you have 2 or more lines configured in your scene.
Note: you will need this calculator only if you use Camlytics Single, the data upload is automatic in the Service version.
You can find the same calculator on a separate page for your convenience.
Support of all cameras
If you have a pre-recorded video footage or you have a regular traffic IP camera and you need speed detection ASAP, Camlytics Single and Camlytis Service are a very simple and a very budget solution. You can even use cameras with broken perspective to detect vehicle speed, all you need to know is the distance between your lines (see the sample below).
Conclusions
If you are looking for a cost-efficient solution for people counting and don't want to waste your money on extra sensor hardware or any devices - look no further, Camlytics is a way to go.
Pricing Downloads Dashboard demo Hardware requirements
Other solutions
If you are looking for the software for vehicle counting, speed detection and vehicle type
classification (pedestrian, car, bus, bike, van, truck), Camlytics is offering it as one of the solutions.
