
Events
Introduction
The major feature of Camlytics Service that makes it stand out from the crowd of video surveillance systems is it's ability to analyze video camera streams in real time, to generate different kinds of events, and send them to the cloud database for storage.
Event is a basic entity that allows Camlytics to build it's real time occupancy reports, charts, provide API access, and more.
All events are generated when tracked objects interact with triggers - line, zone or scene. Lines and zones are configured during the Camlytics Service calibration. You can add multiple lines or zones into the same camera scene.
The default time span (storage time) of events in the Cloud account is 3 months. If you want to store events for longer period, you need to purchase the additional storage units for each of your channels.
Detection profile
The first step in setting up Camlytics Service is choosing the appropriate detection profile. The profile defines which types of objects are detected and how video analytics are performed. Selecting a profile that matches the camera position and the required type of analytics directly affects detection accuracy and system performance.
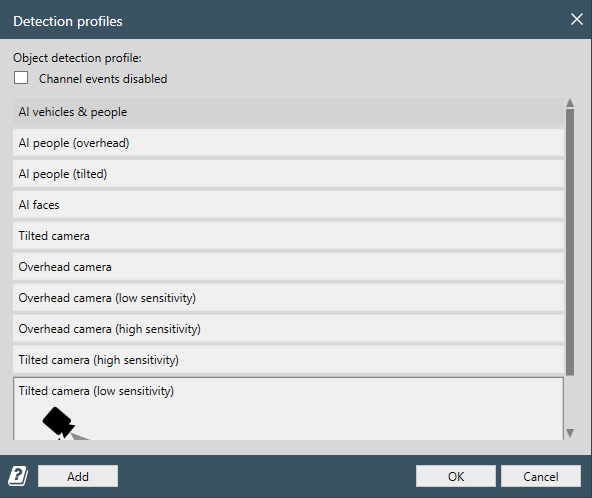
Recommended AI profiles
AI vehicles & people
Use this profile when the camera must detect and classify several types of road users. It supports separate detection of people, vehicles, and bikes, making it suitable for entrances, parking areas, roads, driveways, and mixed pedestrian and vehicle traffic.
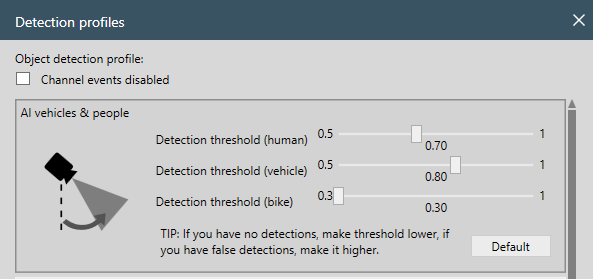
The profile provides an individual detection threshold for each object type:
Detection threshold (human) controls the minimum confidence required to recognize an object as a person.
Detection threshold (vehicle) controls the minimum confidence required to recognize cars and other supported vehicles.
Detection threshold (bike) controls the minimum confidence required to recognize bicycles and other supported bike-type objects.
Configure each threshold independently because image quality and detection accuracy may differ between object types. For example, vehicles may be clearly visible while cyclists occupy only a small part of the image and require a lower threshold.
AI people (overhead)
Use this profile for cameras installed directly above the monitored area with a top-down or near-vertical view. It is intended primarily for counting people passing through doors, corridors, gates, and other narrow counting zones.
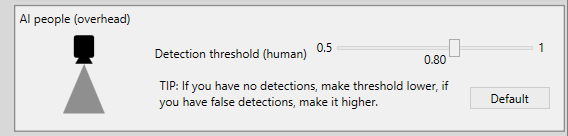
Detection threshold (human) specifies the minimum confidence required for a detected object to be accepted as a person. Overhead views often show less facial and body detail, so the optimal value may differ from the value used for tilted cameras.
AI people (tilted)
Use this profile when the camera is mounted at an angle and people are visible from the front, side, or in perspective. It is suitable for retail spaces, offices, building entrances, halls, sidewalks, and other areas covered by a conventional surveillance camera.
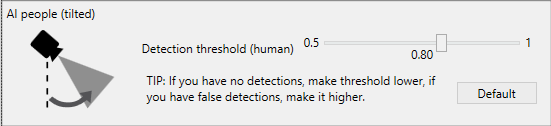
Detection threshold (human) specifies the minimum confidence required to classify a detected object as a person. Select this profile instead of the overhead profile when the camera has a clearly angled view of the scene.
AI faces
Use this profile when facial analytics are required. The camera should provide a sufficiently clear frontal or near-frontal view of faces. Detection quality depends heavily on face size, camera resolution, focus, lighting, and the angle between the face and the camera.
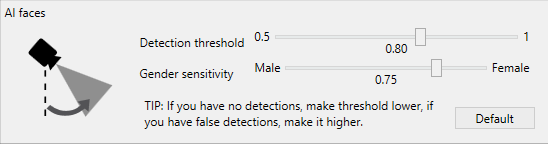
Detection threshold specifies the minimum confidence required for a face detection to be accepted. Increase it to reject uncertain detections or decrease it when valid faces are frequently missed.
Gender sensitivity adjusts the classification balance between Male and Female. Moving the slider toward one side makes the classifier more likely to assign uncertain detections to that category. The central or default position is recommended initially. Adjust this option only after reviewing analytics results from a representative sample of visitors.
How to configure detection thresholds
A detection threshold is the minimum confidence level at which Camlytics accepts a neural network detection. A higher value applies stricter filtering, while a lower value accepts less certain detections.
Lower the threshold when real people, vehicles, bikes, or faces are visible in the video but are not detected consistently. This may be necessary for small or distant objects, partial occlusion, poor lighting, low contrast, or lower-resolution video.
Increase the threshold when the system produces false detections, such as classifying shadows, reflections, signs, furniture, or background objects as valid targets.
Change values gradually and test the result on both live and recorded video. A step of approximately 0.05 is usually sufficient for evaluating the effect of an adjustment. Test during different lighting conditions and periods of both low and high traffic.
Avoid setting the threshold too low. Although this may increase the number of detected objects, it can also produce duplicate events, false counts, and unstable classifications. An excessively high threshold may give cleaner results but miss valid objects.
Use the Default button to restore the recommended default settings for the selected profile.
Non-AI profiles
Overhead camera and tilted camera profiles
These are lightweight profiles that do not use neural-network object classification. They detect general movement or object flow but do not distinguish between people, vehicles, and other moving objects. For example, a person and a car may be processed as the same type of moving object.
Use these profiles when only basic entry, exit, or traffic-flow counting is required, or when the computer does not have sufficient resources for AI processing.
High and low sensitivity variants
Sensitivity determines how easily motion or an object produces a detection event. A high-sensitivity profile can detect smaller or less distinct movement but may generate more false events. A low-sensitivity profile filters minor movement more aggressively but may miss small, slow, or partially visible objects.
Start with the standard or recommended sensitivity level. Select a higher-sensitivity option if valid objects are frequently missed, or a lower-sensitivity option if shadows, reflections, vegetation, changing light, or background movement produce false counts.
Channel events disabled
Enable Channel events disabled to stop detection and analytics events for the selected channel. The option is useful when the camera is required only for live viewing or recording, or when analytics for that channel are temporarily not needed.
Disabling channel events prevents the channel from generating counting and detection data. Verify this option if a configured camera produces no analytics events.
Choosing and testing a profile
Select a profile according to the actual camera angle rather than the name or purpose of the monitored location. Use an overhead profile only for a top-down view and a tilted profile for a perspective view.
After selecting a profile, test it with representative video. Check normal traffic, crowded scenes, partial occlusion, different object sizes, and daytime and nighttime lighting. Compare detected events with the actual number of objects. If valid objects are missed or false detections occur, try another sensitivity variant of the profile and adjust the Object size setting in the calibration section.
Calibration (only for non-AI profiles)
Calibration is required only when using non-AI detection profiles. These profiles rely on traditional motion-based tracking, so accurate calibration is essential for reliable object detection, counting, and heatmaps.
To access calibration settings, go to Calibration in the channel menu.
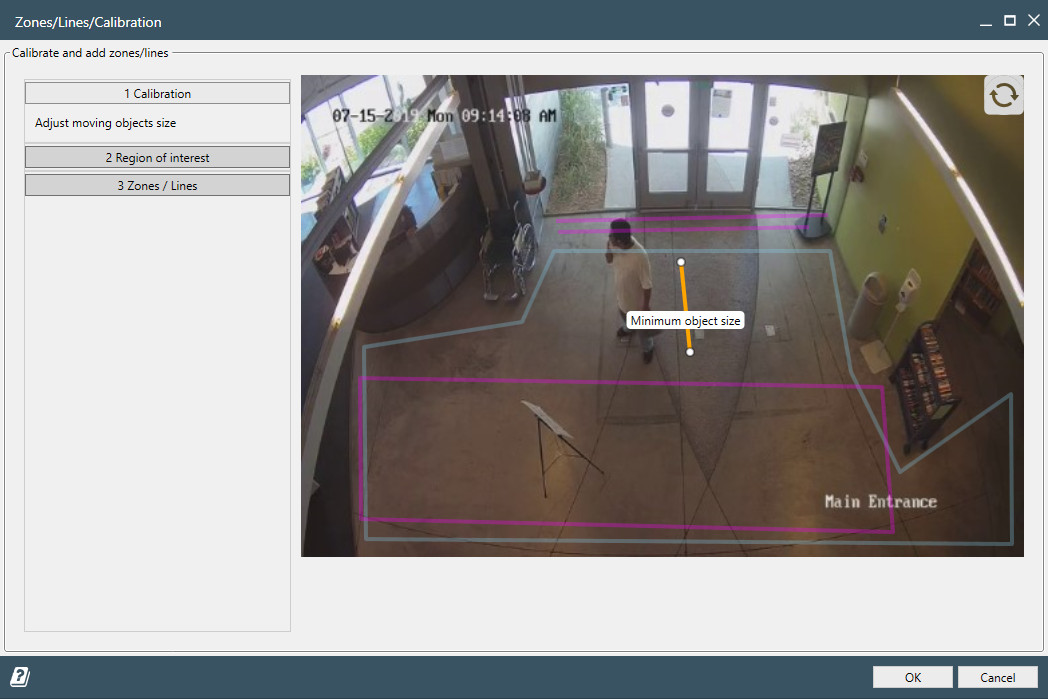
In the Calibration section, you’ll see a ruler overlaid on a video snapshot. This ruler must be adjusted to match the real-world size of a typical object in your scene. Choose an average-sized object you want to track (usually a person), and scale the ruler to fit it accurately.
- For Overhead camera profiles, the ruler should match a person seen from above.
- If object sizes vary significantly in the scene, it's better to calibrate based on the smaller object.
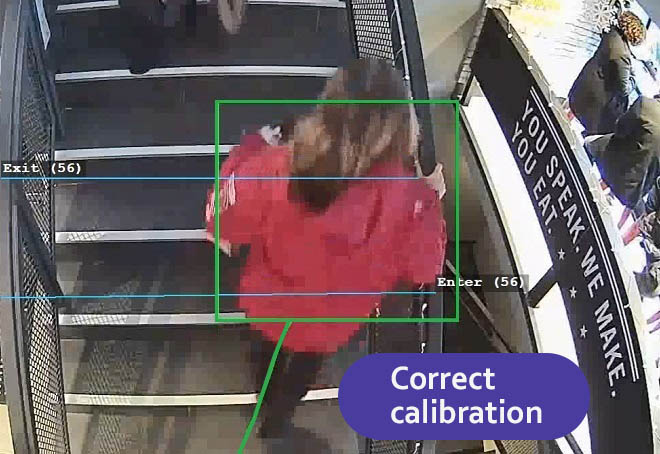
- Proper calibration ensures that the green tracking boxes closely match the size of actual objects.
Examples of good calibration
- Green tracking boxes align with real object dimensions.
- Tracking is smooth and consistent.
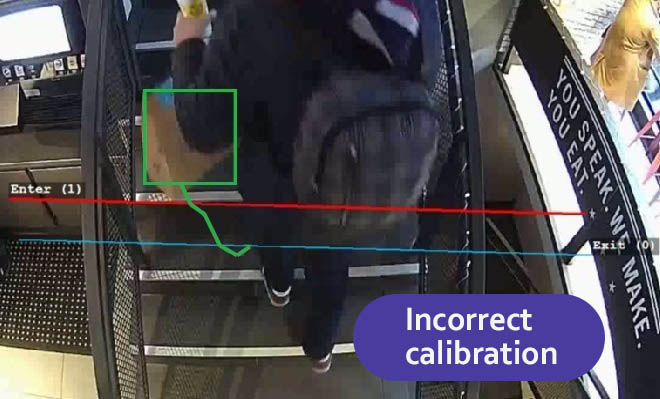
Examples of bad calibration
- Ruler set too large or too small.
- Tracking boxes are oversized or tiny, leading to poor results and unstable analytics.
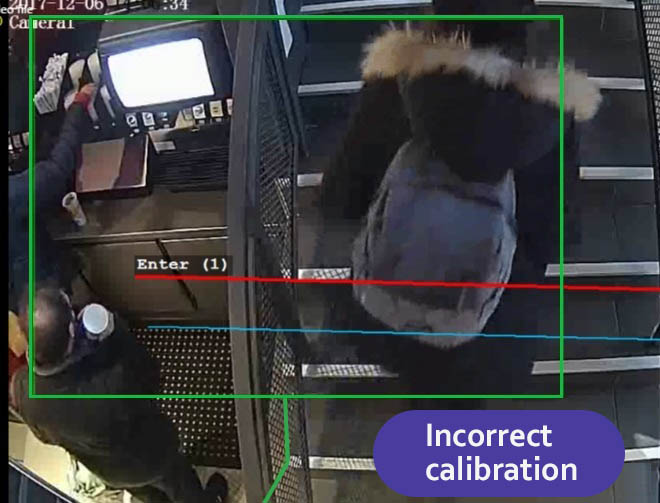
For Tilted camera profiles, it’s also critical to set the marker correctly, as it affects the system’s understanding of minimum and maximum object sizes for detection.
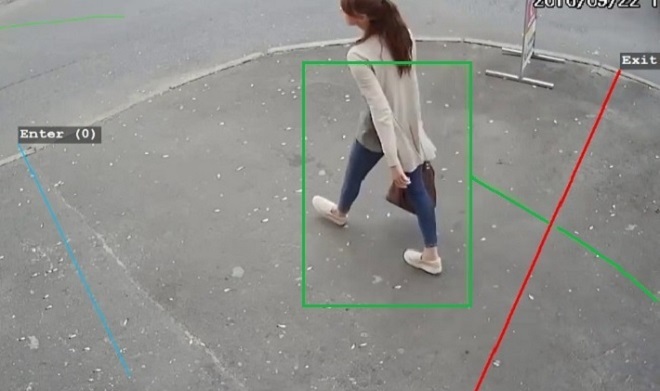
Once calibration is complete, you can proceed to define the Area of Interest, detection lines, and zones.
Area of Interest
The Area of Interest defines the region of the video where analytics will be active and objects will be detected. By default, it covers the entire camera view, but in most cases, it should be narrowed down.
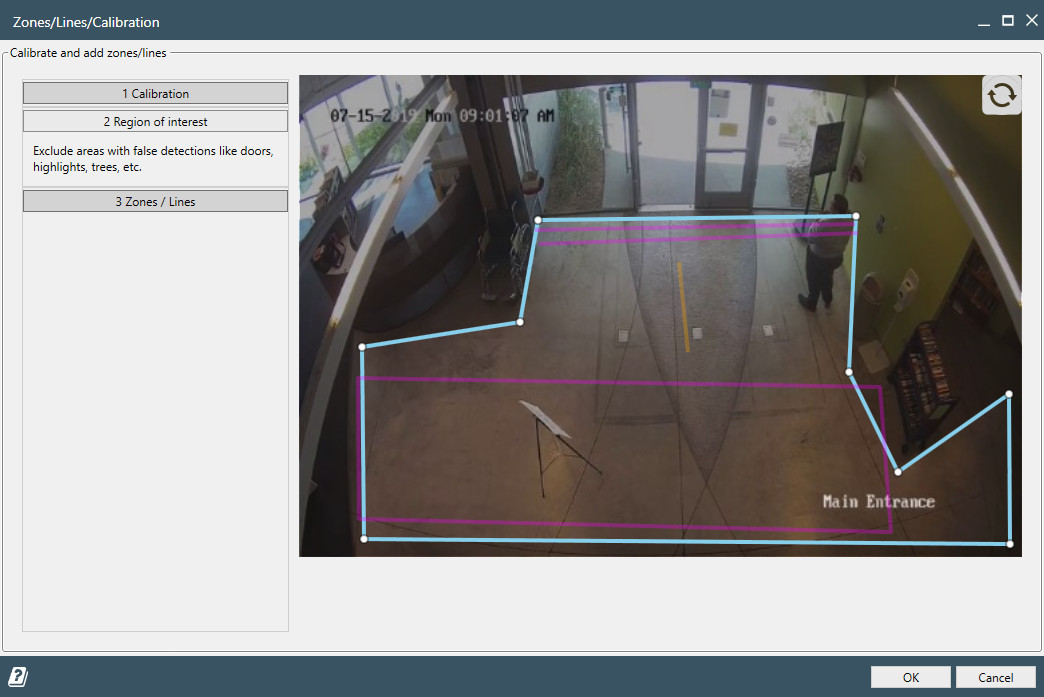
- For AI profiles (e.g. AI people, AI vehicles & people, AI face), AOI helps reduce visual noise by limiting detection to relevant parts of the scene, improving accuracy and lowering processing load.
- For non-AI profiles (e.g. Overhead camera, Tilted camera), AOI is critical — it allows you to exclude unwanted motion, such as automatic doors, elevators, moving trees, or reflections. Without a properly configured AOI, detection and counting can be severely affected by false triggers.
You can adjust the area freely by adding or removing nodes via double-click on the AOI boundary.
Triggers (Zones, Lines, and SpeedLines)
Triggers are core elements that define what types of movement and activity the system should detect and respond to. They let you track object flow, count events, measure speed, and generate automated responses.
There are three types of triggers:
Lines
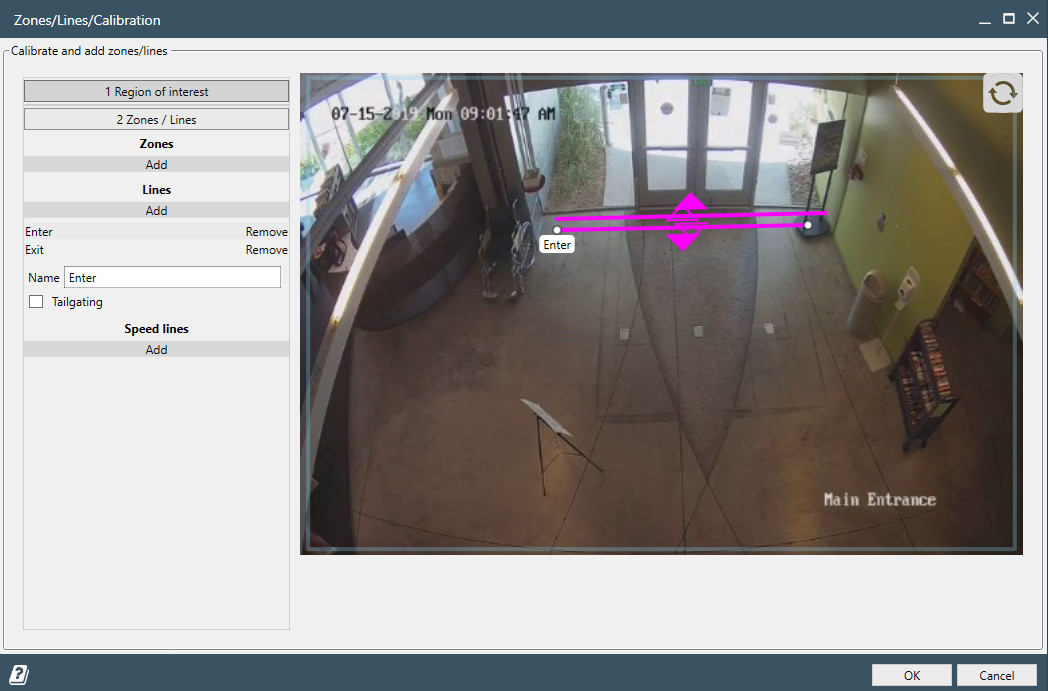
Lines are used to count objects crossing a virtual line in the video. You can configure:
- One-way or two-way detection
- Entry/exit logic
- Object type filters (e.g., only people or vehicles in AI profiles)
Lines are ideal for entrances, gates, hallways, or any directional flow monitoring.
You can also enable Tailgating detection by checking the Tailgating option for a line. This event triggers when two objects cross the same line within a short interval (typically under 1 second).
Tailgating detection is especially useful for access control scenarios, such as monitoring office entry points to detect when someone follows another person through a secured gate or door without proper authorization. It works best with overhead cameras and people-counting profiles.
Zones
Zones detect objects entering, moving, or dwelling in specific areas of the video frame.
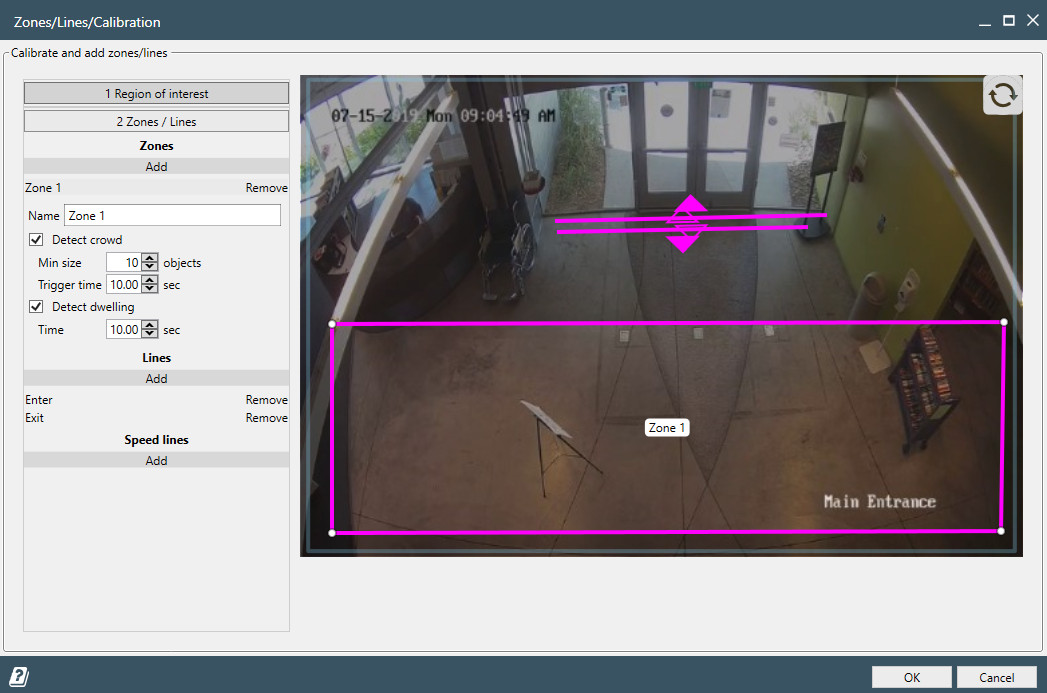
Each zone has two built-in events — Zone joined and Motion started
— which are always active and do not require configuration.
In addition, zones support two optional and configurable event types:
Object dwell– triggers when an object stays inside the zone longer than a specified dwell time (in seconds)Crowd appear– triggers when a defined minimum number of objects are present in the zone for a set duration
These advanced triggers are useful for detecting loitering, queues, overcrowding, or unusual idle behavior within critical areas.
SpeedLines
SpeedLines allow for both speed measurement and trajectory-based counting.
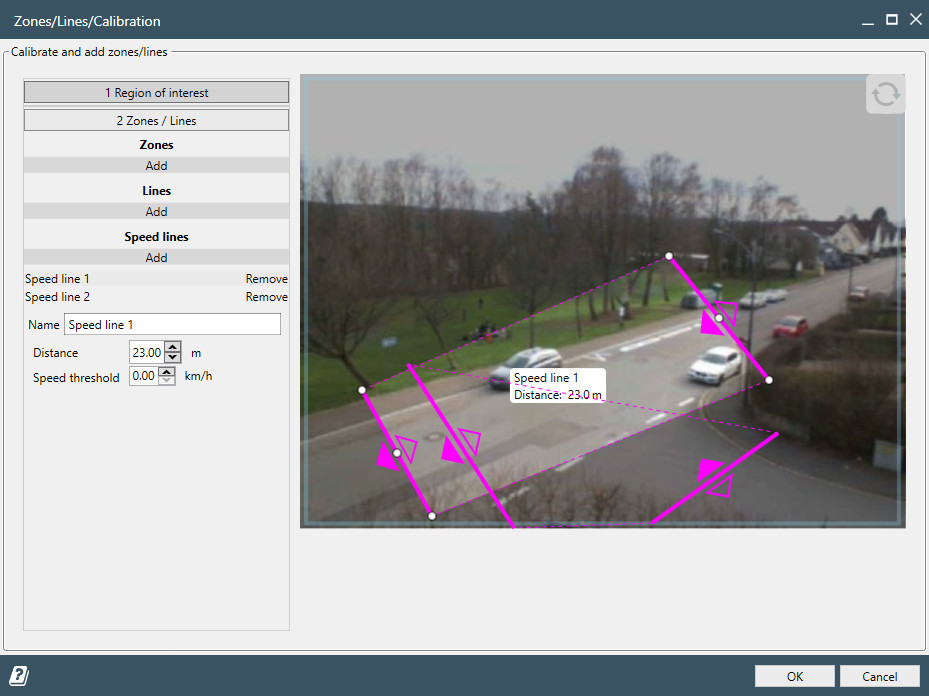
- Measure how fast objects move between two lines
- Set thresholds to detect overly fast or slow movement
- Ideal for traffic monitoring, speeding alerts, or identifying abnormal pedestrian behavior
In addition to speed analytics, SpeedLines can also be used to count objects moving along specific paths.
For example:
- At an intersection, you can count vehicles turning right separately from those going straight across a perpendicular road
- Useful in traffic analysis, flow segmentation, or behavior mapping in complex environments
SpeedLines are powerful when you need to understand how fast and in which direction people or vehicles are moving.
All triggers can be layered and combined within a single scene. You can name them, export event data, connect them to APIs or webhooks, and use them for real-time alerts or historical analysis.
Event types
There are multiple event types that power the full range of Camlytics reports. Every event is generated by a unique tracked object that carries an ID and classification details (Human, Vehicle, etc.).
You can find the event types table below.
| Name | Trigger | Description | Has object ID | Object classification |
|---|---|---|---|---|
| Line crossed | Line | Fired when a line is crossed by object of any kind. | Yes | Yes |
| Tailgating | Line | Fired when two objects cross the same line with small delay (up to 1 sec). Useful for access security monitoring. Mostly used with people counting. Read more in our use cases. | Yes | Yes |
| SpeedLine crossed | SpeedLine | Fired when an object crosses both internal lines of a SpeedLine trigger in sequence. | Yes | Yes |
| Zone joined | Zone | Fired when an object has joined the zone. | Yes | Yes |
| Motion started | Zone | Indicates of motion start in a zone. Triggered by object entering the zone.
If object just appeared, Zone joined and Motion started events will happen simultaneously. |
Yes | Yes |
| Object dwell | Zone | Fired when object that has been in a zone for long enough time (configurable during calibration). | Yes | Yes |
| Crowd appear | Zone | Fired when many enough objects have been in a zone for long enough time (configurable during calibration). | No | No |
| Camera obstructed | Scene | Indicates that the camera has been obstructed partly or completely by light, huge object, etc. or the camera has been shifted. Analogous to the "Sabotage" event. | No | No |
Line crossed
Trigger: Line
Fired when an object of any kind crosses a configured virtual line. Each event carries a unique object ID and classification (Human, Vehicle, etc.), making it the most versatile event type in Camlytics. It tracks both the direction of crossing and the object type, which enables precise in/out tracking for occupancy calculations.
Object ID: Yes Object classification: Yes
Used in reports:
- Current crossings - real-time count of how many times the line was crossed
- Current occupancy - calculates the number of objects inside based on entry/exit line crossings
- Events - compare or sum crossing counts across lines and time periods
- Hourly/Daily events - distribution of crossings by hour or day of week
- Vehicles classification - available when using the AI vehicles & people detection profile
- Gender & age - available when using the AI Faces detection profile
- Conversions - measure conversion rate against event counts for any trigger
Tailgating
Trigger: Line (with Tailgating option enabled)
Fired when two objects cross the same line within a short interval (up to 1 second). This is a security-focused event designed to detect unauthorized access - for example, when someone follows another person through a secured gate or door without proper authorization. Works best with overhead cameras and people-counting profiles. Read more in our use cases.
Object ID: Yes Object classification: Yes
Used in reports:
- Events - monitor tailgating incidents over time
- Hourly/Daily events - identify time patterns of tailgating incidents
- Gender & age - available when using the AI Faces detection profile
- Conversions - measure conversion rate against event counts for any trigger
SpeedLine crossed
Trigger: SpeedLine
Fired when an object crosses both internal lines of a SpeedLine trigger in sequence. A SpeedLine consists of two linked lines placed at a distance from each other - the event is generated only when the same object crosses the first line and then the second, which allows the system to calculate the time elapsed between the two crossings and derive the object's speed. This makes SpeedLine crossed the only event type that carries a measured speed value per event.
Object ID: Yes Object classification: Yes Speed data: Yes
Used in reports:
- Speed - estimates and charts object speeds derived from the time between crossing both SpeedLine lines
- Trajectory - counts objects moving along specific paths (e.g. turning vs. going straight at an intersection)
Zone joined
Trigger: Zone
Fired when an object enters (joins) a zone. Always active for any zone — no additional configuration required.
Each event carries the object's unique ID and classification.
If an object appears directly inside the zone without crossing its boundary, Zone joined and Motion started fire simultaneously.
Object ID: Yes Object classification: Yes
Used in reports:
- Events - count and compare zone entries over time
- Hourly/Daily events - distribution of zone entries by hour or day
- Vehicles classification - available when using the AI vehicles & people detection profile
- Gender & age - available when using the AI Faces detection profile
- Conversions - measure conversion rate against event counts for any trigger
Motion started
Trigger: Zone
Indicates the start of motion activity in a zone, triggered when an object enters.
Always active for any zone - no additional configuration required.
If an object appears directly inside a zone, Zone joined and Motion started fire simultaneously.
Unlike Zone joined, which tracks each individual object entry, Motion started signals zone-level activity.
Object ID: Yes Object classification: Yes
Used in reports:
- Events - count motion start events in a zone over time
- Hourly/Daily events - distribution of motion events by hour or day
- Vehicles classification - available when using the AI vehicles & people detection profile
- Gender & age - available when using the AI Faces detection profile
- Conversions - measure conversion rate against event counts for any trigger
Object dwell
Trigger: Zone (configurable dwell time threshold)
Fired when an object remains inside a zone longer than the configured dwell time threshold (set in seconds during zone setup).
Unlike Zone joined, this event only fires after the object has been present long enough -
making it ideal for filtering out brief, incidental zone entries.
Useful for detecting loitering, long queue wait times, or idle objects in restricted areas.
Object ID: Yes Object classification: Yes
Used in reports:
- Events - count and compare dwell events over time
- Hourly/Daily events - distribution of dwell events by hour or day
- Vehicles classification - available when using the AI vehicles & people detection profile
- Gender & age - available when using the AI Faces detection profile
- Conversions - measure conversion rate against event counts for any trigger
Crowd appear
Trigger: Zone (configurable minimum object count and duration)
Fired when a defined minimum number of objects are simultaneously present in a zone for a set duration. Both the minimum count and duration are configurable during zone setup. Designed to detect overcrowding, queue buildup, or unusual crowd concentration in critical areas. Since this event reflects the aggregate zone state rather than a single tracked object, it carries no individual object ID or classification.
Object ID: No Object classification: No
Used in reports:
- Events - monitor crowd appearance incidents over time
- Hourly/Daily events - identify peak crowd periods by hour or day
Camera obstructed
Trigger: Scene (automatic, no configuration required)
Indicates that the camera has been obstructed partially or completely - by a bright light source, a large object placed in front of the lens, or because the camera has been physically shifted. Analogous to the "Sabotage" event in traditional security systems. Since it reflects the state of the camera rather than a tracked object, it carries no object ID or classification.
Object ID: No Object classification: No
Used in reports:
- Events - monitor camera health and detect tampering incidents over time
- Hourly/Daily events - identify patterns of camera obstruction by hour or day
Events page
Events page allows you browsing all events that are stored on your Cloud account. You can filter by location, channel, trigger name, time, type, class (Vehicle/Human/etc.). When the filtered events are shown, you can export them into a .csv spreadsheet.
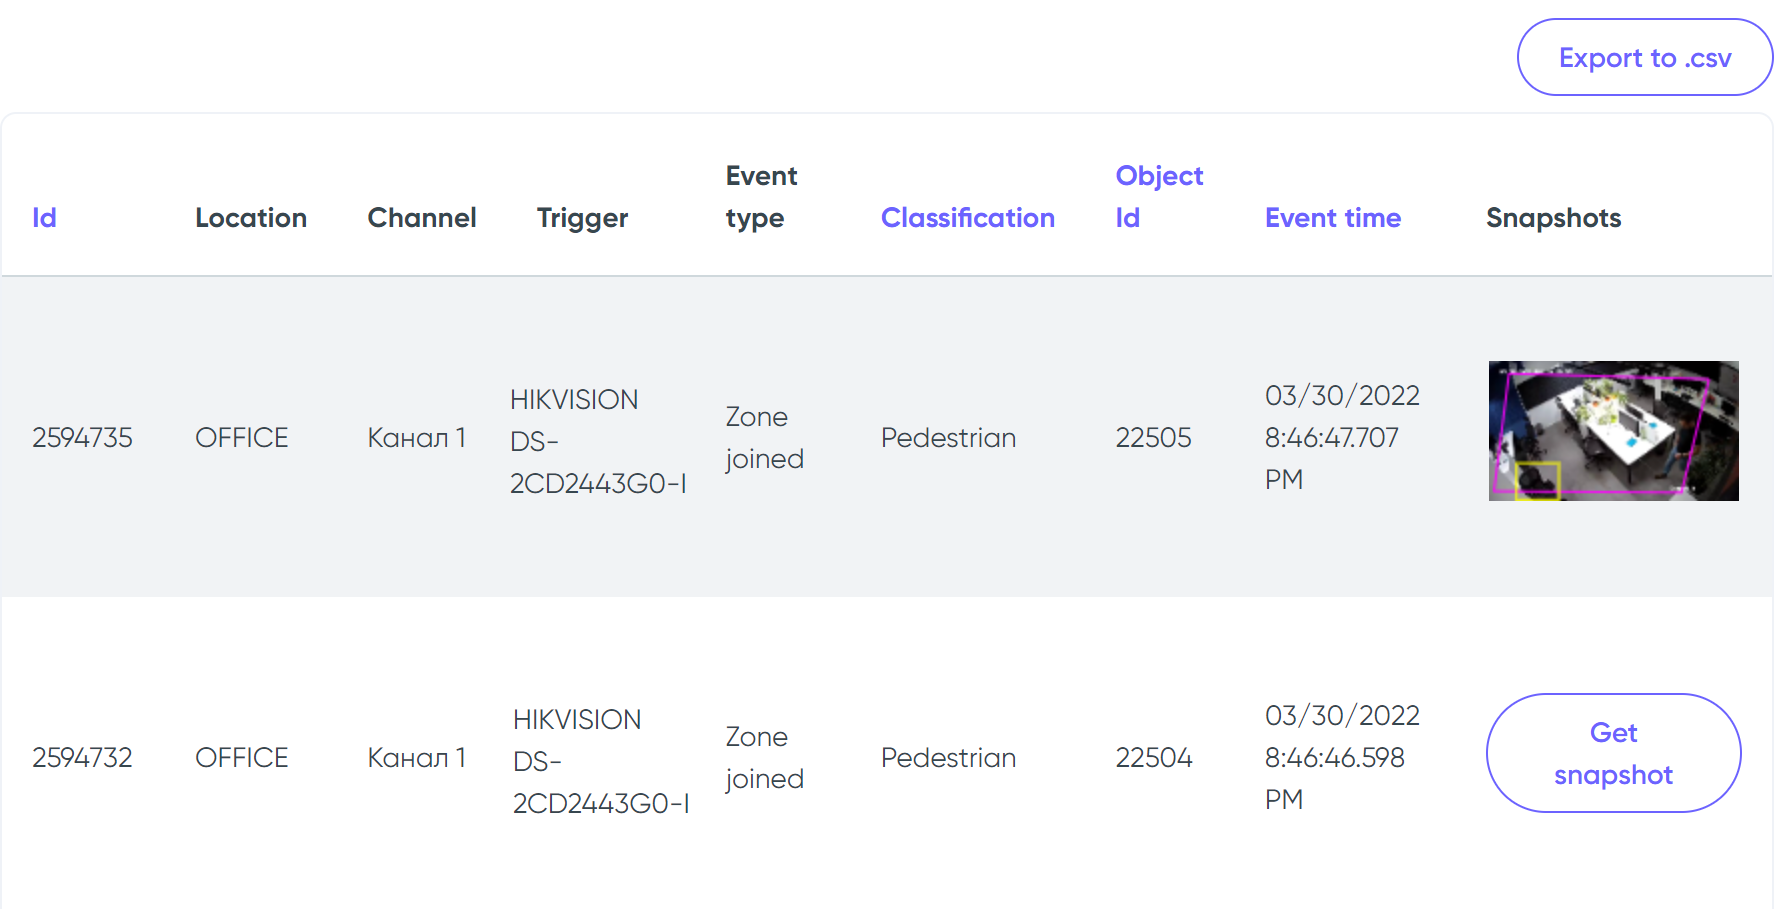
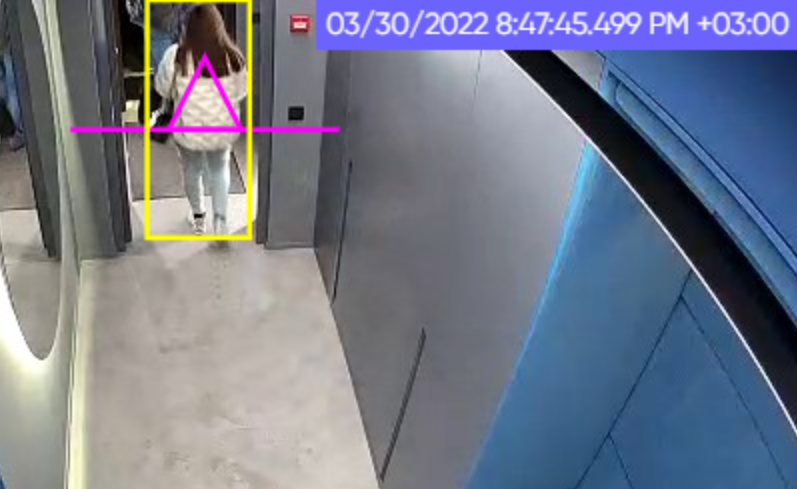
You can also get snapshot of each of the events. All snapshots are stored on a local machine with running Camlytics Service and are pulled from there upon the "Get snapshot" button click.
Feed URL
The Events page provides a Feed URL - a signed link that returns event data as a CSV file, suitable for use with Power BI, Excel, or any other tool that can consume a URL-based data source.

To get a Feed URL, you need an API key. Once created, the Feed URL will appear above the events table on the Events page. The URL reflects the currently selected filters — submit the form with the desired filters to generate a new URL.
Key characteristics:
- Historical data only — today's events are always excluded. The file covers data up to and including yesterday.
- Daily refresh — the file is regenerated automatically once per day. Requesting the URL on a new day will trigger a new file to be prepared.
-
Asynchronous generation — the file is not created instantly.
On first request (or after daily refresh), the endpoint returns a
202 Processingresponse. Wait a moment and request the URL again until the CSV file is returned. - Signed URL — the URL contains a public key and an HMAC-SHA256 signature. The secret key is never exposed in the URL.
Using with Power BI:
- Copy the Feed URL from the Events page.
- In Power BI: Home → Get Data → Web, paste the URL and click OK.
- Select Anonymous authentication when prompted.
- If the import fails with a "processing" message, wait 1–2 minutes and refresh.
- After publishing to Power BI Service, configure Scheduled Refresh to run once daily to keep data up to date.