Locations & Channels
Locations and channels
Location is the activated Camlytics Service desktop application that connects directly to your IP/web cameras.
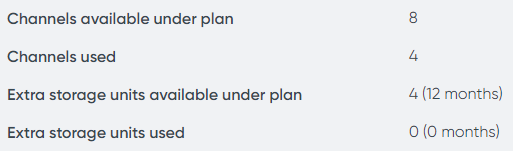
The upper block on the Locations & Channels page displays information about the number of available and used channels, as well as the number of paid and used extra storage units in accordance with your subscription.
Below you will see the list of your locations together with their connection status and each channel (camera) status - online or offline. You will also see the active Camlytics Service version on each location and the timezone.
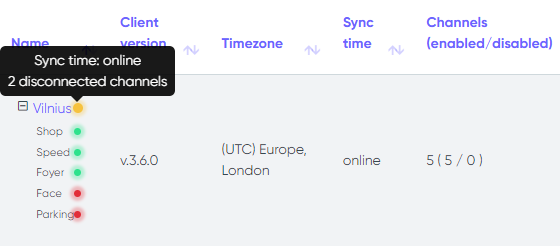
Clicking on a location will reveal more details.
Information
In the Location information block, you can view and manage key settings for your desktop installation of Camlytics Service.
You can:
- Rename your location – click the pencil icon next to the name, enter a new title, and click Update.
- Set timezone – choose the correct timezone from the dropdown list and click Set timezone.
- Set desktop password – define a password to restrict access to the Camlytics Service desktop app on this location. Click Set password to apply changes.
- Remove location – click Remove location (available after 7 days of being offline) to permanently delete the location from your account.
Below these basic settings, you will find the Camlytics Service desktop app settings section, which lets you control access permissions for features available in the desktop client.
General settings:
- Storage – allow or block access to storage features
- Decoding – allow or restrict video decoding operations
Channel settings:
- Recording – control access to local recording
- Channels – allow or deny adding/removing channels
- Profile – allow or restrict changes to detection profiles
- Snapshots – allow or restrict access to image snapshots
- Heatmap – enable or disable heatmap generation
- Playback – control access to local video archive playback
After making changes, click Save to apply permissions.
These settings are especially useful for managing shared or remote deployments where user access should be limited to only necessary functions.
Channels
Channel is a camera connected to your Camlytics Service desktop application.
Active channels are cameras currently streaming in your locations. Active channel does not ensure that statistics is collected on it (the channel must be enabled to collect statistics). "Active" only means that corresponding camera is connected to your location.
Removed channels are cameras that were previously active but were deleted afterwards. As soon as the statistics on removed channels expires, the channels will be deleted from your location permanently.
Supported video sources
- Local USB/web cameras
- IP cameras via RTSP or ONVIF
- Video streams over HTTP(S) or RTSP
RTSP and ONVIF sources are auto-discovered in the desktop app. You can also add them manually using stream URLs.
Managing cameras (desktop app)
There are several ways to add a camera in the Camlytics Service desktop app:
- Auto-discovery – drag a discovered ONVIF or RTSP-compatible camera from the source list into the scene panel.
- Manual add – click Manual and enter your RTSP or HTTP stream URL directly.
- Camera Wizard – use the step-by-step setup assistant to detect and configure the camera.
Adding a camera using Camera Wizard:
The Camera Wizard guides you through the connection process:
- Select the camera model and IP address (or scan the local network)
- Enter login and password if the stream is protected
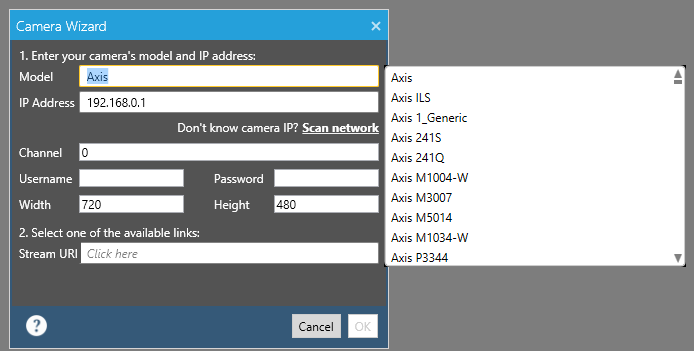
If you already know your direct stream link (e.g. RTSP), you can paste it directly into the URL field. For example:
rtsp://admin:password@123.218.82.30/default-Primary0?streamType=u
If your exact model is not listed, try selecting a different model from the same manufacturer — many models share the same stream structure.
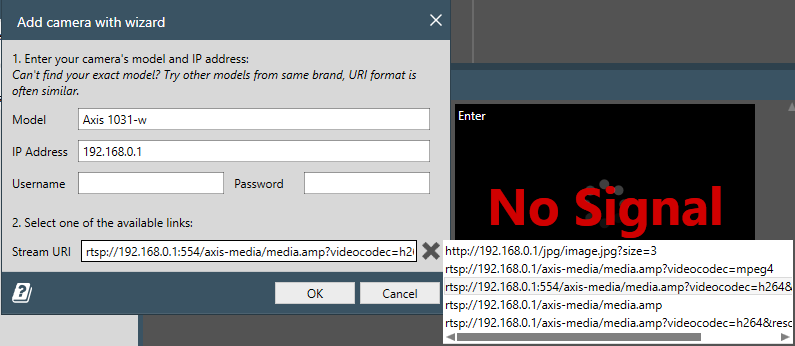
Once the camera is added, you will see a new Manual channel in the source list. Drag it into the scene panel (or double-click) to activate the video feed.
After placing the camera in the scene, the Channel usage scenario dialog will appear. This helps apply the correct detection settings for the selected camera.
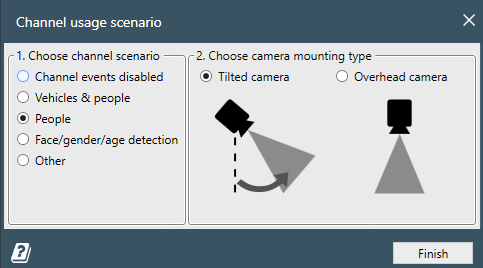
Step 1: Choose channel scenario:
- Channel events disabled – disables analytics for the channel
- Vehicles & people – enables detection of both people and vehicles
- People – enables detection of people only
- Face/gender/age detection – enables face-based demographic analytics
- Other – basic object tracking without classification
Step 2: Choose camera mounting type:
- Tilted camera – use for angled side views (e.g. wall-mounted)
- Overhead camera – use for top-down views (e.g. ceiling-mounted directly above)
These choices automatically apply the best fitting detection profile and tracking parameters for the selected setup.
After adding, the camera will appear in your layout. You can right-click the camera tile to rename, remove, or configure its channel settings such as resolution, detection profile, or local recording options.
Channel settings (desktop)
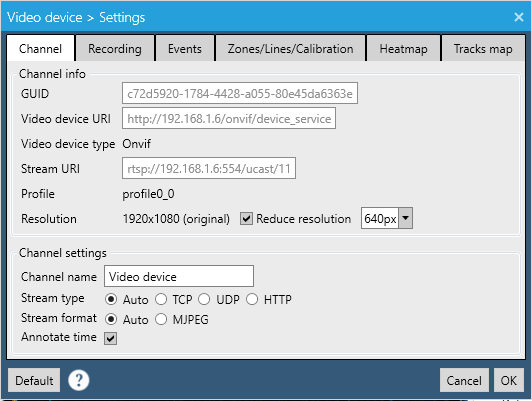
You can configure individual channel parameters in the desktop application by right-clicking the channel tile and selecting Channel info & settings. The following options are available:
- Channel name – custom name for identifying the camera feed
- GUID – unique identifier automatically assigned to the channel
- Video device type – indicates the source type (e.g. Manual streams)
- Stream URI – the actual RTSP or HTTP address used to pull the video stream
- Video device URI – used for identifying or naming the device in the system
- Stream type – choose between Auto, TCP, UDP, UDP Multicast, or HTTP depending on camera and network compatibility
- Stream format – Auto or MJPEG depending on camera capabilities
- Hardware decoding – enable to offload video decoding to the GPU if supported
- Disabled – check this to temporarily disable the channel without deleting it
- Resolution – shows the original input resolution (e.g. 480p), and lets you reduce it (e.g. to 360p) to save processing resources
Click OK to apply changes or Cancel to discard them.
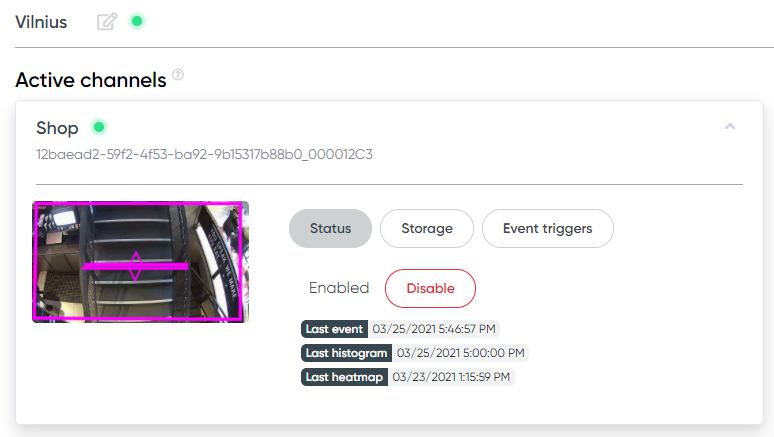
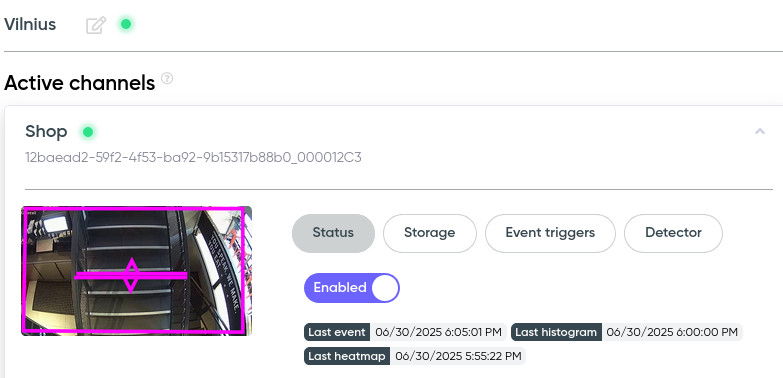
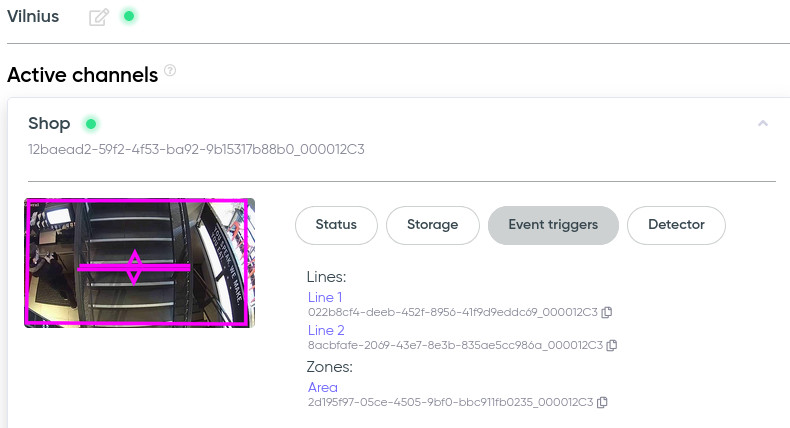
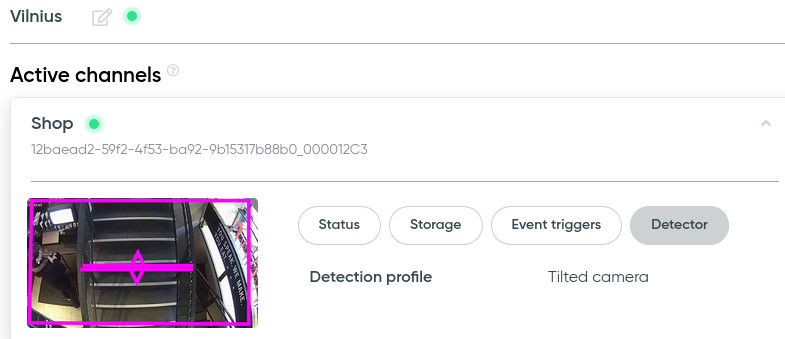
Channel info tabs (cloud portal)
Clicking on a channel in the portal opens detailed information split into the following tabs:
Status – shows channel status (enabled/disabled), on/off toggle, last event time, last histogram, and last heatmap.
Storage – shows data retention period, number of extra storage units, and lets you add or remove storage.

Event triggers – displays active triggers configured in the desktop app (lines, zones, etc.).
Detector – shows the selected detection profile for this channel. Detection mode is configured in the desktop app and is read-only in the portal.
Enable/Disable channel
To start collecting data in the cloud, you need to enable the desired channel. You can only enable the channel if you have enough available channels in your subscription.
Data is not collected for a disabled channel.
To enable a channel, open the card of the desired channel, and click the Enable button on the Status tab.
Disabling a channel is performed in the same way by pressing the Disable button.
Be careful! If the channel has extra storage units, they are also removed when the channel is turned off, and the data older than 3 months on this channel will be removed.
If you have just one active channel subscription and you want to switch the channel for which this subscription is used, just disable the channel under a subscription and enable the desired channel.
Add/Remove extra storage units
By default, Camlytics Service stores events for 3 months. An extra storage unit allows you to store your data in the cloud for a longer period.
When would you need this?
If you need to build statistics that compares current data with the data from the previous quarter or the previous year, you will need extra storage units.
For example, you have conducted an active advertising campaign for the past six months and want to compare your store’s traffic before, during and after the advertising campaign. To do this, you'd need the data for at least the last year.
You can add one or more additional storage units to the desired channel. Each additional unit increases the storage period of your data by 3 months, i.e. with one extra storage unit, data on the channel will be stored for 6 months, with two for 9 months, etc.
To add an extra storage unit, open the card of the desired channel and click the Add button on the Storage tab. To delete an extra storage unit, on the Storage tab, click the Remove button.
If you want to move your purchased storage unit to another channel, just remove it from one channel and add it to another.